
Pasta patate e fagiolini


Today we're making a truly delicious dish—you’ll find it hard to stop eating it.
Pasta with Potatoes and Green Beans!
This is a traditional recipe from Liguria, and it’s a classic summer lunch.
For this recipe, we’ll need the pesto we learned to make in the previous recipe.
You didn’t miss it, did you?? If you did, scroll down and check it out—it takes very little time and is absolutely worth it!
Let’s take a look at the ingredients.
INGREDIENTS:
Pesto
10.5 oz (about 2 medium) potatoes
9 oz frozen green beans
5.5 oz pasta
Salt, to taste
Black pepper, to taste
Parmesan cheese or nutritional yeast, to taste
INSTRUCTIONS:
Bring about 6 cups (1.5 liters) of water to a boil.
Meanwhile, cut the potatoes into cubes about 3/4 inch (2 cm) wide and add salt to taste.
Add the potatoes to the water—even if it hasn’t started boiling yet.
When the potatoes are tender but not fully cooked, add the green beans and pasta.
While the pasta and vegetables are cooking, place the pesto in a large bowl, add 1 tablespoon of Parmesan cheese or nutritional yeast, and a ladle of cooking water. Stir to loosen the pesto.
Once the pasta is cooked (always al dente), drain everything and pour it into the bowl with the pesto.
Mix well, and it’s ready to serve!
Hear the sound of creaminess.
Crank up the volume!
Buon appetito!
PESTO
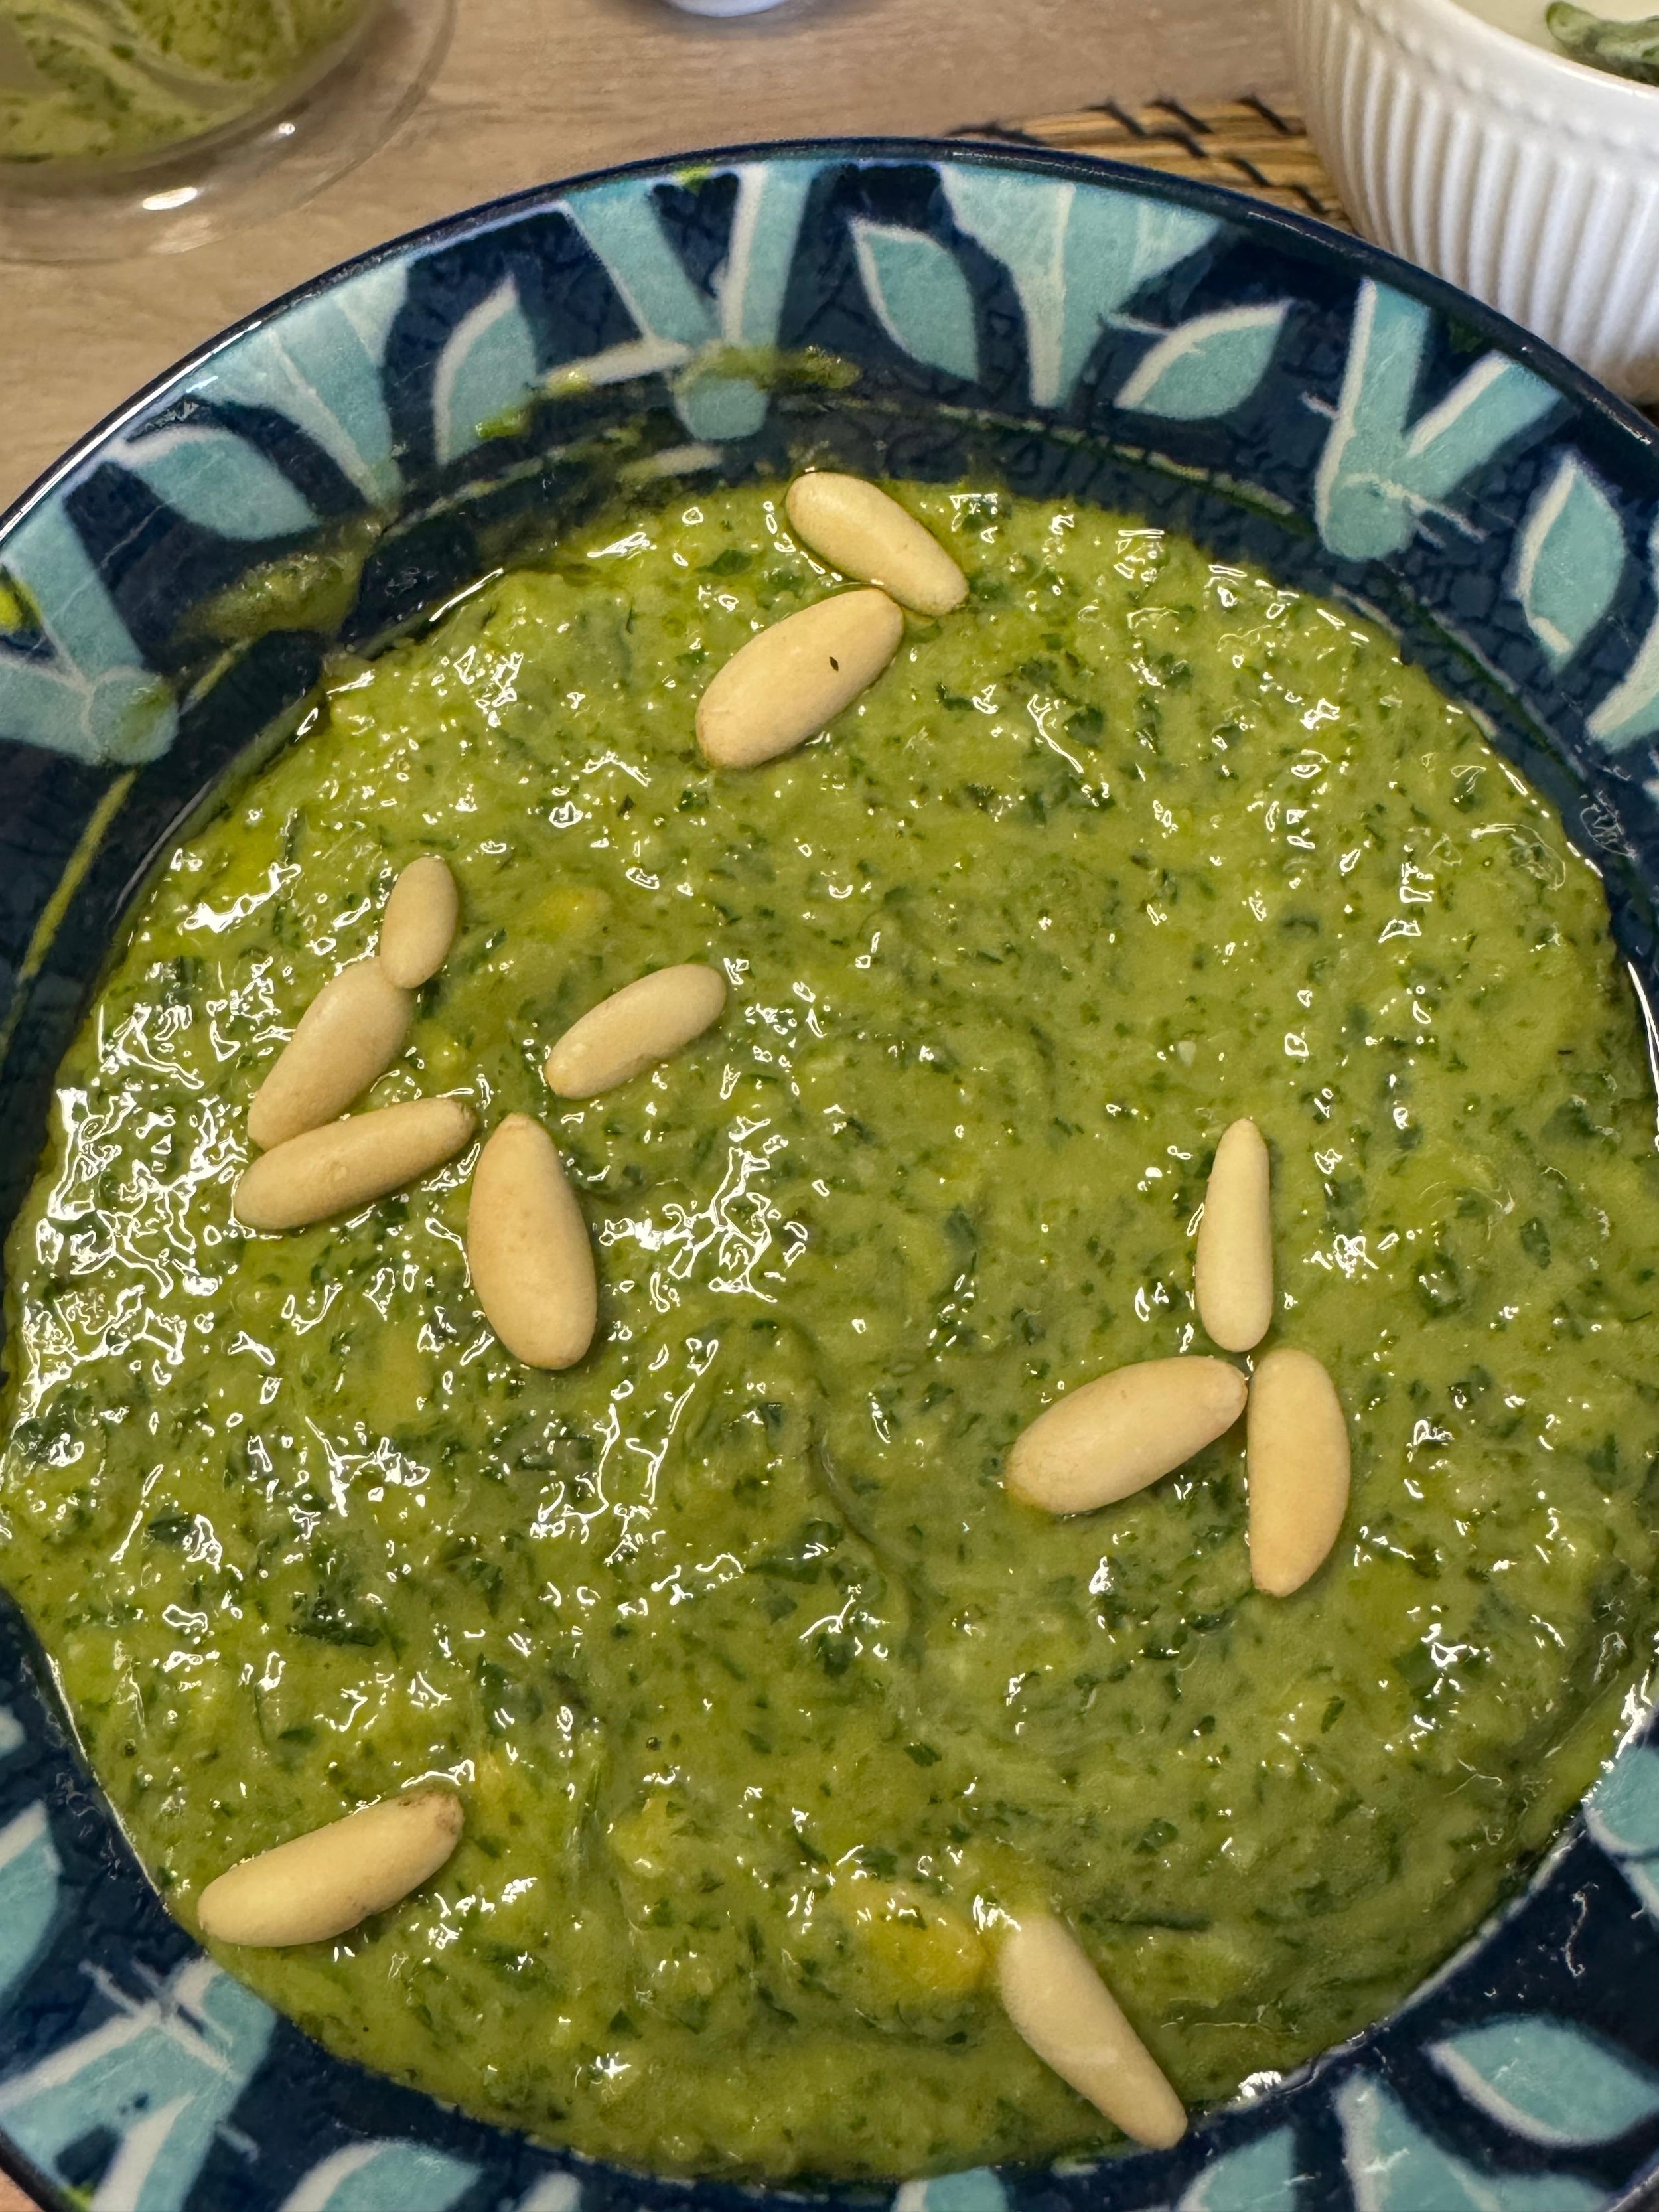
With the fragrant aroma and freshness of basil, today we’re making Pesto alla Genovese!
I truly believe it's one of the most delicious things out there and it comes in many variations.
Traditionally, pesto should be made with a mortar and pestle to preserve its authentic flavor.
But for convenience, today we’ll use a food processor!
As I mentioned, we’re making pesto today, but stay tuned because next week we’ll be using it to make a pasta dish that’s anything but ordinary.
(Check the bottom of the recipe!)
It’ll be a super summery recipe… and yes, it will be addictive!
Let’s check out the ingredients.
Ingredients:
1½ cups fresh basil leaves (about 2.8 oz / 80 g)
¾ cup grated Parmesan cheese (about 2.5 oz / 70 g)
(use nutritional yeast for the vegan version)¼ cup pine nuts (about 1 oz / 30 g)
½ teaspoon salt (about 0.1 oz / 3 g)
5 tablespoons extra virgin olive oil (about 2.5 oz / 70 g)
1 garlic clove (optional)
Instructions:
Start by washing all the basil leaves well in cold water, then dry them thoroughly.
Using a food processor, pulse the pine nuts first until slightly chopped.
Add the basil and salt, and pulse intermittently. This prevents the ingredients from heating up and losing flavor or color.
Scrape down the sides with a spoon and blend again to combine everything evenly.
Once the mixture becomes fairly creamy, add the Parmesan (or nutritional yeast) and pulse a couple more times.
Finally, add the olive oil and mix everything together with a spoon.
TIPS:
1. To make your pesto even creamier, add an ice cube to the food processor while blending! ❄️
It helps keep the temperature low and preserves the vibrant green color, while giving the sauce a smoother texture.
And just like that your homemade pesto is ready!
2. Pesto isn’t just great with pasta!
It’s amazing on bruschetta too.
Just toast some bread, spread a layer of pesto, top it with cherry tomatoes, a pinch of salt and pepper.
Enjoy!

Spoiler for the next recipe:
Pasta with Potatoes and Green Beans!
Stay tuned! 🌿🍝
SUPPLì

Today we’re making a typical Roman street food: Supplì.
If you’ve ever been to Rome, chances are you’ve tried them!
They’re close cousins of Sicilian arancini, oval-shaped instead of round, with a simple goodness that makes you want to dance.
To me, Supplì smell like summer, happiness, and holidays.
But what are they exactly?
They’re basically rice balls filled with tomato sauce and mozzarella, dipped in batter and deep fried.
Let’s be honest—most delicious things are fried.
As they say in Roman dialect: "Se sà, fritto è bono tutto!" (“Everyone knows, everything tastes better if it’s fried!”)
Let’s take a look at what we need and how to make them perfect for your next dinner with friends or as an appetizer.
Ingredients:
1¼ cups rice (about 8.8 oz / 250 g)
¾ cup plain tomato purée (about 7 oz / 200 g)
3.5 oz mozzarella (use vegan mozzarella for a vegan version)
2 cups + 2 tablespoons of hot water
Salt, to taste
Olive oil, to taste
Batter:
1 cup cold water (about 8.8 oz / 250 g)
1⅔ cups all-purpose flour (about 7 oz / 200 g)
1⅔ cups breadcrumbs (about 7 oz / 200 g)
Salt, to taste
4¼ cups vegetable oil for frying (about 34 oz / 1 liter — peanut oil or extra virgin olive oil is best)
Instructions:
In a pot, toast the rice for about 30 seconds over medium-low heat.
Add the hot water and cook the rice fully using the absorption method— by the end, the water should be fully absorbed.
Add a little more water if needed.While the rice is cooking, make a simple tomato sauce:
Heat a drizzle of olive oil in a pan, add finely chopped onion, then pour in the plain tomato purée.
Season with salt (make sure to use plain, unseasoned tomato purée).
Let the sauce simmer for 15–20 minutes.
3. When both the rice and the sauce are ready, combine them.
Taste and adjust with more salt and optionally a pinch of black pepper.
4. Spread the rice mixture onto a baking sheet lined with parchment paper.
Let it cool completely, then place it in the fridge for about 3 hours.
This helps it firm up nicely.
5. About 10 minutes before the resting time is up, prepare the batter.
In one bowl, mix together the flour, cold water, and salt until smooth.
Cut the mozzarella into small cubes and set aside.
Place the breadcrumbs in a second bowl.
Line another tray with paper towels to absorb the oil from the cooked supplì.
6. Take the rice out of the fridge.
Put some rice in your hand and flatten it.
Place a few mozzarella cubes in the center.
Cover with a little more rice, shape it into a ball, and then roll it into an oval shape.
Dip each supplì first in the flour batter, then roll it in the breadcrumbs to coat.
7. Repeat with all the remaining rice, you should get around 10 supplì with these amounts.
8. Heat the oil to start frying. Once the oil is hot, carefully lower the supplì and fry until golden brown.
Remove them and place them on the prepared tray to drain the excess oil.
Let them rest for a minute, then serve hot!
Note:
If you prefer not to fry them, follow the same recipe but instead of deep-frying, bake them in the oven with a drizzle of oil on top at 390°F (200°C) for about 30 minutes.
Tell me they’re not one of the most delicious things ever?!
Buon Appetito!
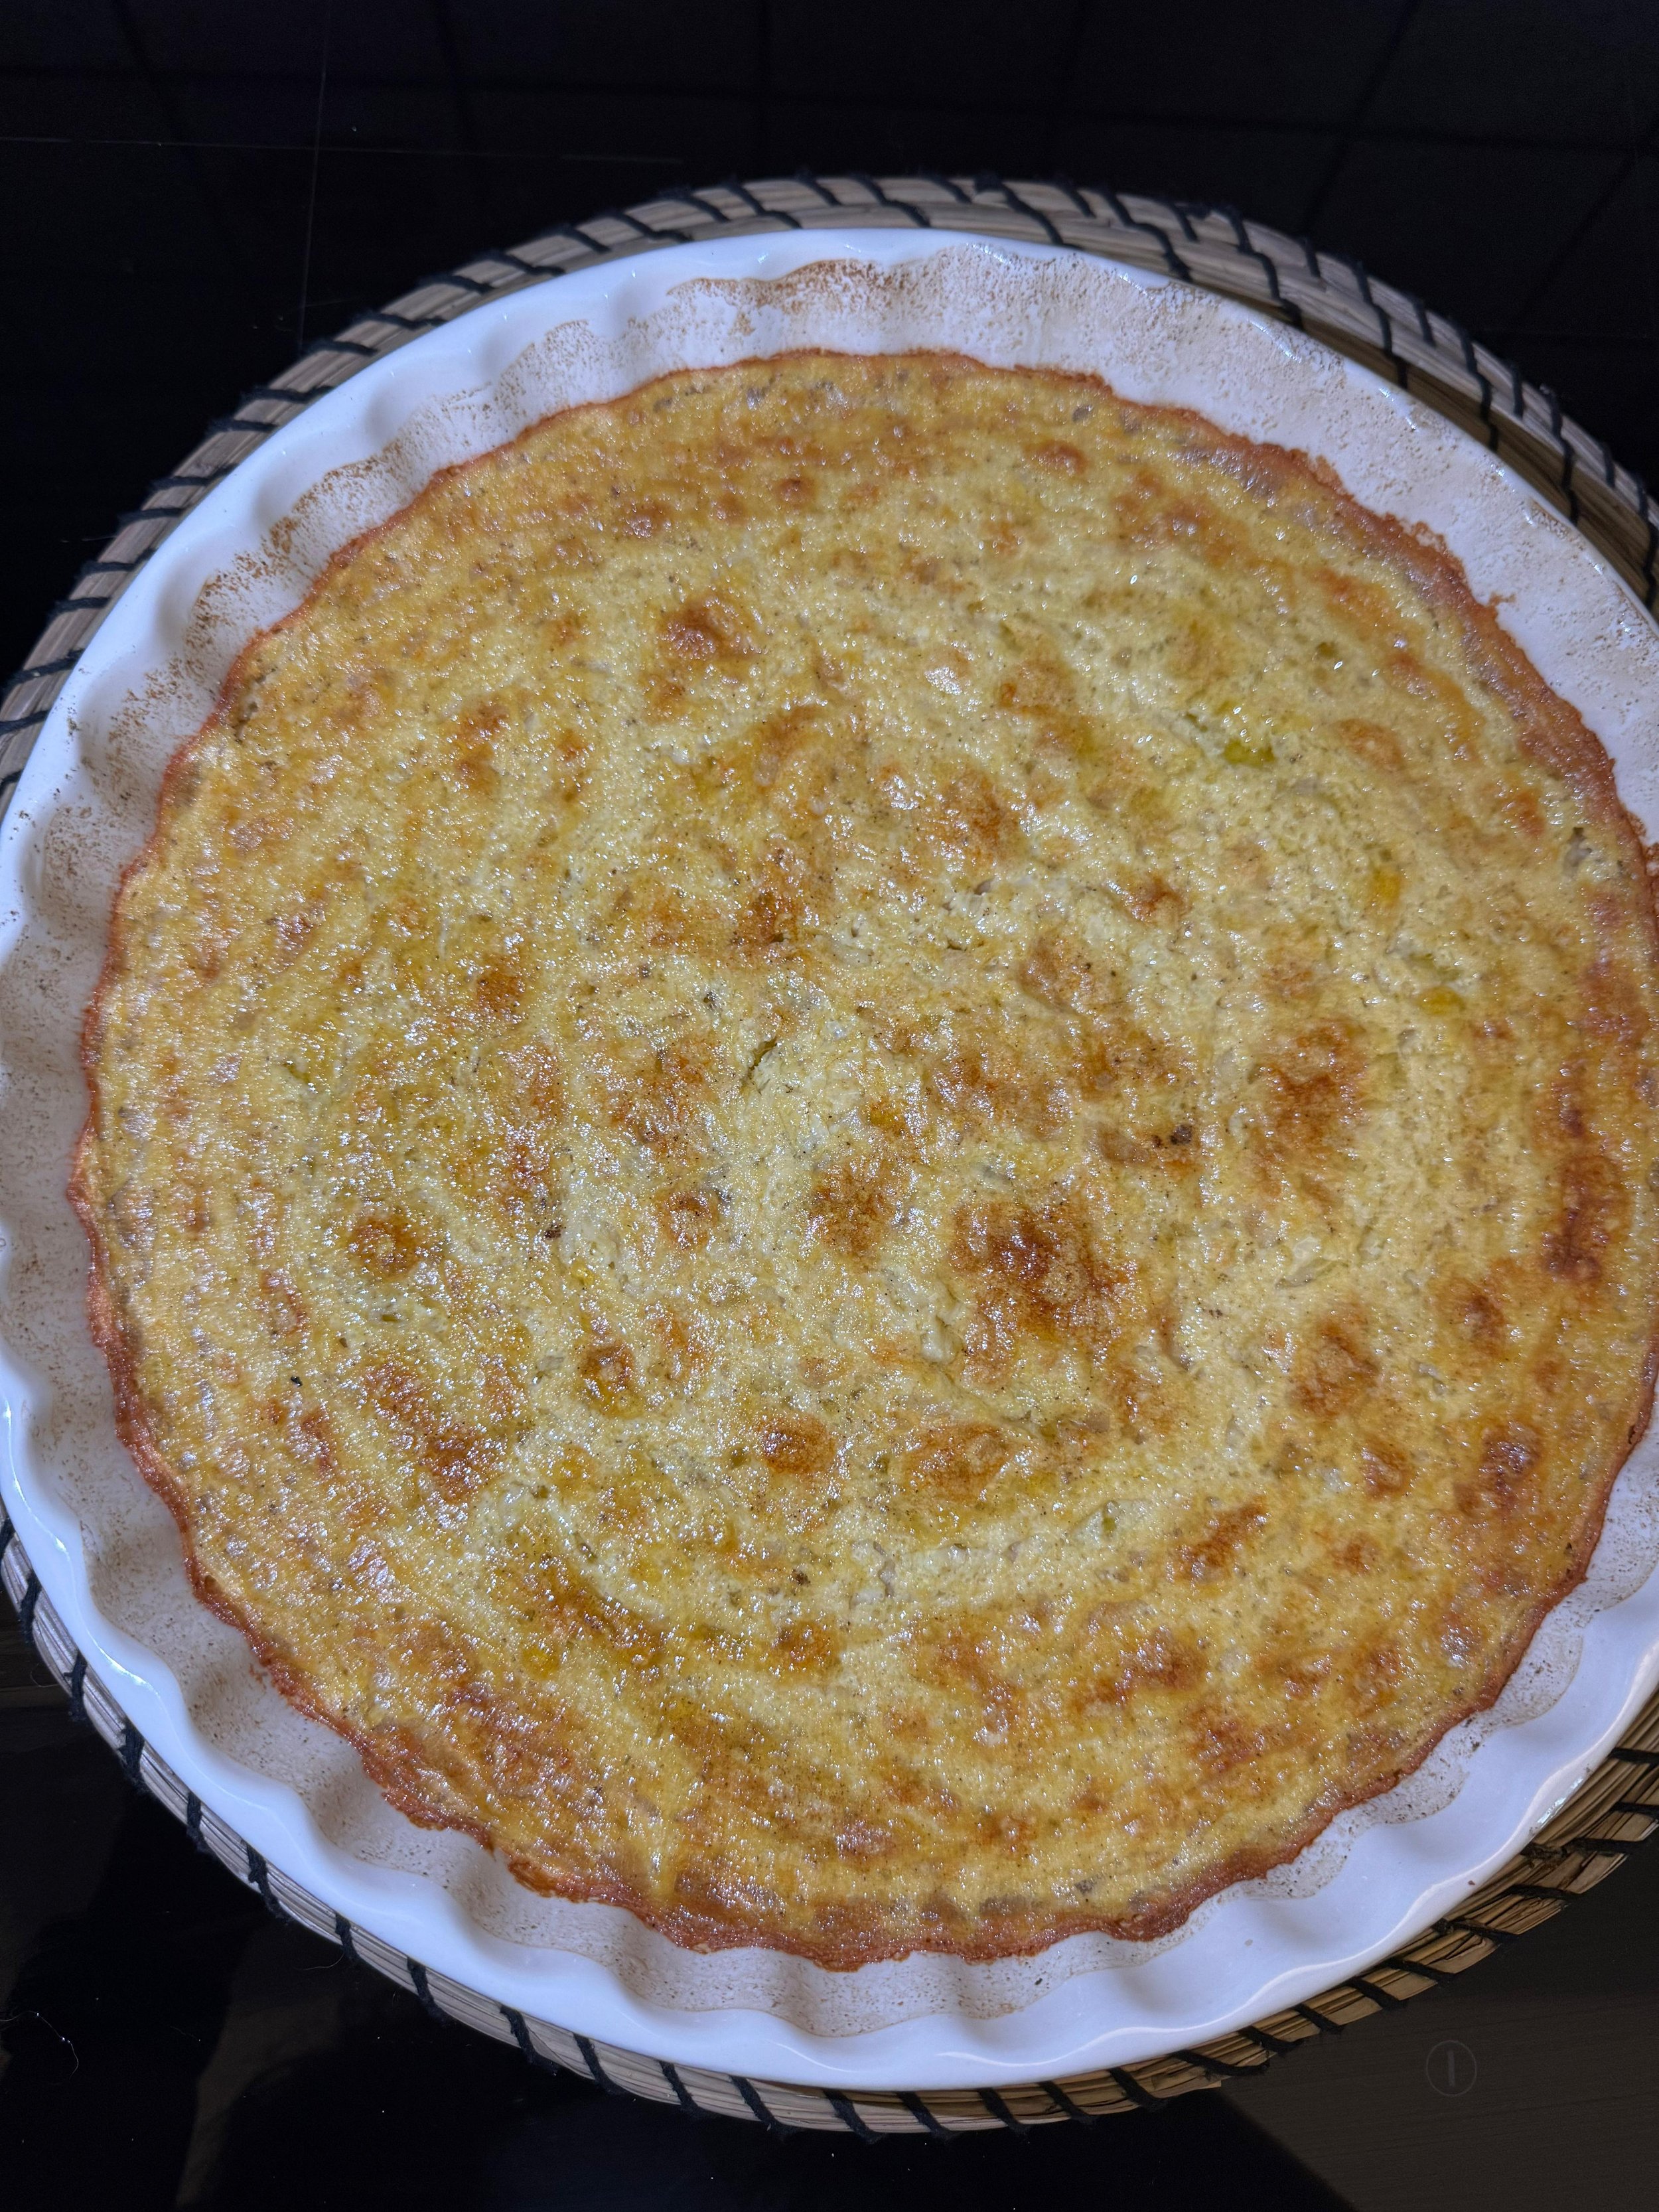
FARINATA

Today we’re flying to Liguria!
Let’s make a delicious and super simple Farinata.
Farinata originated in Liguria and later spread to Tuscany and Piedmont.
It’s made with just a few basic ingredients, but the result is incredible: a delicate golden crust on top and a soft, tender interior.
Over time, it became a tradition in some Italian regions to begin your meal at a pizzeria with a slice of Farinata.
Let’s see what we need and how to make it!
Ingredients:
(For a round pan about 11 inches in diameter)
1¼ cups chickpea flour (about 5.3 oz / 150 g)
2 cups room-temperature water (about 15.8 oz / 450 g)
2 tablespoons extra virgin olive oil (about 1 oz / 30 g)
1 teaspoon salt
A pinch of black pepper
Instructions:
In a large bowl, pour all the water and dissolve the salt.
Slowly add the chickpea flour while whisking continuously until the batter is smooth and lump-free.
Let the batter rest in the fridge for a couple of hours.
3. Preheat your oven to 430°F.
4. Take the batter out of the fridge. You’ll notice a thin layer of foam on top—remove it with a small strainer.
5. Stir in the olive oil.
6. Grease your baking pan with a bit of oil and pour in the batter. Sprinkle a pinch of pepper on top.
7. Bake on the lowest rack of the oven for about 15 minutes, then move it to the middle rack and bake for another 10–15 minutes. Add a little more pepper before serving.
Note:
Cooking time may vary depending on the thickness of the Farinata.
The thinner it is, the faster it will cook.
You’ll know it’s ready when a golden crust forms on top.
Once out of the oven, let it rest for 10–15 minutes before slicing, as it will be very soft inside when freshly baked.
Buon Appetito!
LASAGNA ALLA BOLOGNESE

What can we make with the ragù we learned to cook last week??
A real, simple, and perfect Lasagna alla Bolognese!
I can honestly say that lasagna is actually a pretty easy dish to make, but the Italian-American version isn’t the authentic Italian one - it’s Italian-American.
Let’s take a look at how to make the classic Italian version!
First of all, it’s important to know that lasagna is assembled with just a few ingredients: ragù, béchamel sauce, and lasagna noodles.
We already learned how to make the ragù, so now let’s see how the béchamel sauce is made!
Classic Béchamel Sauce (Italian Style)
Ingredients:
4 tablespoons (½ stick) unsalted butter (vegan butter or olive oil for vegan version)
¼ cup all-purpose flour
2 cups whole milk (preferably warm) (soy milk unsweetened for vegan version)
A pinch of salt
A pinch of ground nutmeg (optional, but traditional)
Instructions:
In a medium saucepan, melt the butter over medium heat.
Once the butter is fully melted, add the flour and whisk continuously to form a smooth paste (this is called a roux).
Cook the roux for about 1–2 minutes, whisking constantly, without letting it brown.
Slowly pour in the warm milk, continuing to whisk to avoid lumps.
Keep stirring over medium heat until the sauce thickens—this should take about 5–7 minutes.
Add a pinch of salt and a little ground nutmeg, if you choose to add it.
Keep stirring.
Your béchamel is ready when it coats the back of the spoon smoothly.
How to Assemble a Classic Lasagna alla Bolognese
Instructions:
Preheat the oven to 375°F (190°C).
Start layering in a baking dish (around 9x13 inches is ideal):
Spread one spoonful of béchamel and one spoonful of ragù on the bottom to keep the pasta from sticking.
Add the first layer of lasagna noodles.
Spread a layer of ragù over the noodles.
Add a layer of béchamel sauce on top of the ragù.
Sprinkle with Parmigiano (nutritional yeast for vegan version).
Repeat the layers (pasta → ragù → béchamel → Parmigiano) until you reach the top of the dish or run out of ingredients.
Finish with a layer of béchamel and a generous sprinkle of Parmigiano
Cover loosely with aluminum foil and bake for 25 minutes.
Remove the foil and bake for another 15–20 minutes, until bubbly and golden on top.
Let it rest for 10–15 minutes before slicing and serving. This helps the layers set.

ENJOY!
Buon appetito!
RAGÙ ALLA BOLOGNESE
BOLOGNESE SAUCE

Today we’re making a true Italian classic…
Ragù!
There are many different types of ragù depending on what Italian region you’re in,
but today we’re preparing the most traditional and well-known version, Ragù alla Bolognese.
Do you know what ragù means to us Italians?
It’s the smell that would wake you up on a Sunday morning,
when you’d sleep in and skip breakfast…going straight to lunch!
But do you know the real secret to a good ragù?
It has to simmer on low heat for at least 2 to 3 hours.
This recipe can also be used as the base for many other dishes!
Let’s check out the ingredients:
INGREDIENTS:
1 yellow onion
1 large carrot
1 stalk of celery
1 lb ground beef (or 1 lb of Beyond Meat for a vegan version)
1 cup of dry red wine
1 sprig of rosemary
4 cups (about 1 quart) of plain tomato purée (important: no pre-seasoned sauces — look for the kind in a glass bottle like Flora, or in a box like POMÍ)
Olive oil, to taste
Salt, to taste
INSTRUCTIONS:
Finely chop the onion, carrot, and celery.
In a large pot over medium heat, pour in about 4 tablespoons of olive oil, heat it up, and add the chopped vegetables along with the rosemary sprig. Sauté until the vegetables are soft. This is what is known as soffritto, a cornerstone of Italian cuisine and the starting point for countless other recipes.
At this point we add the ground beef.
Use a wooden spoon to break it up and stir frequently so it cooks evenly and doesn’t stick.
Sauté the meat for one or two minutes.


Raise the heat and deglaze with red wine.
Let the wine completely evaporate.
Remove the rosemary sprig, lower the heat, and pour in the tomato purée.
Then, fill the tomato bottle halfway with water, shake it, and pour it into the pot as well.
Let it cook for about an hour, then add salt to taste.
Stir every now and then, and let it simmer for about 2 more hours.
And that’s it — super simple!
Now, just boil some water, add salt when it boils, and cook your favorite pasta.
Make sure to cook it al dente!
Buon appetito! 🇮🇹🍝
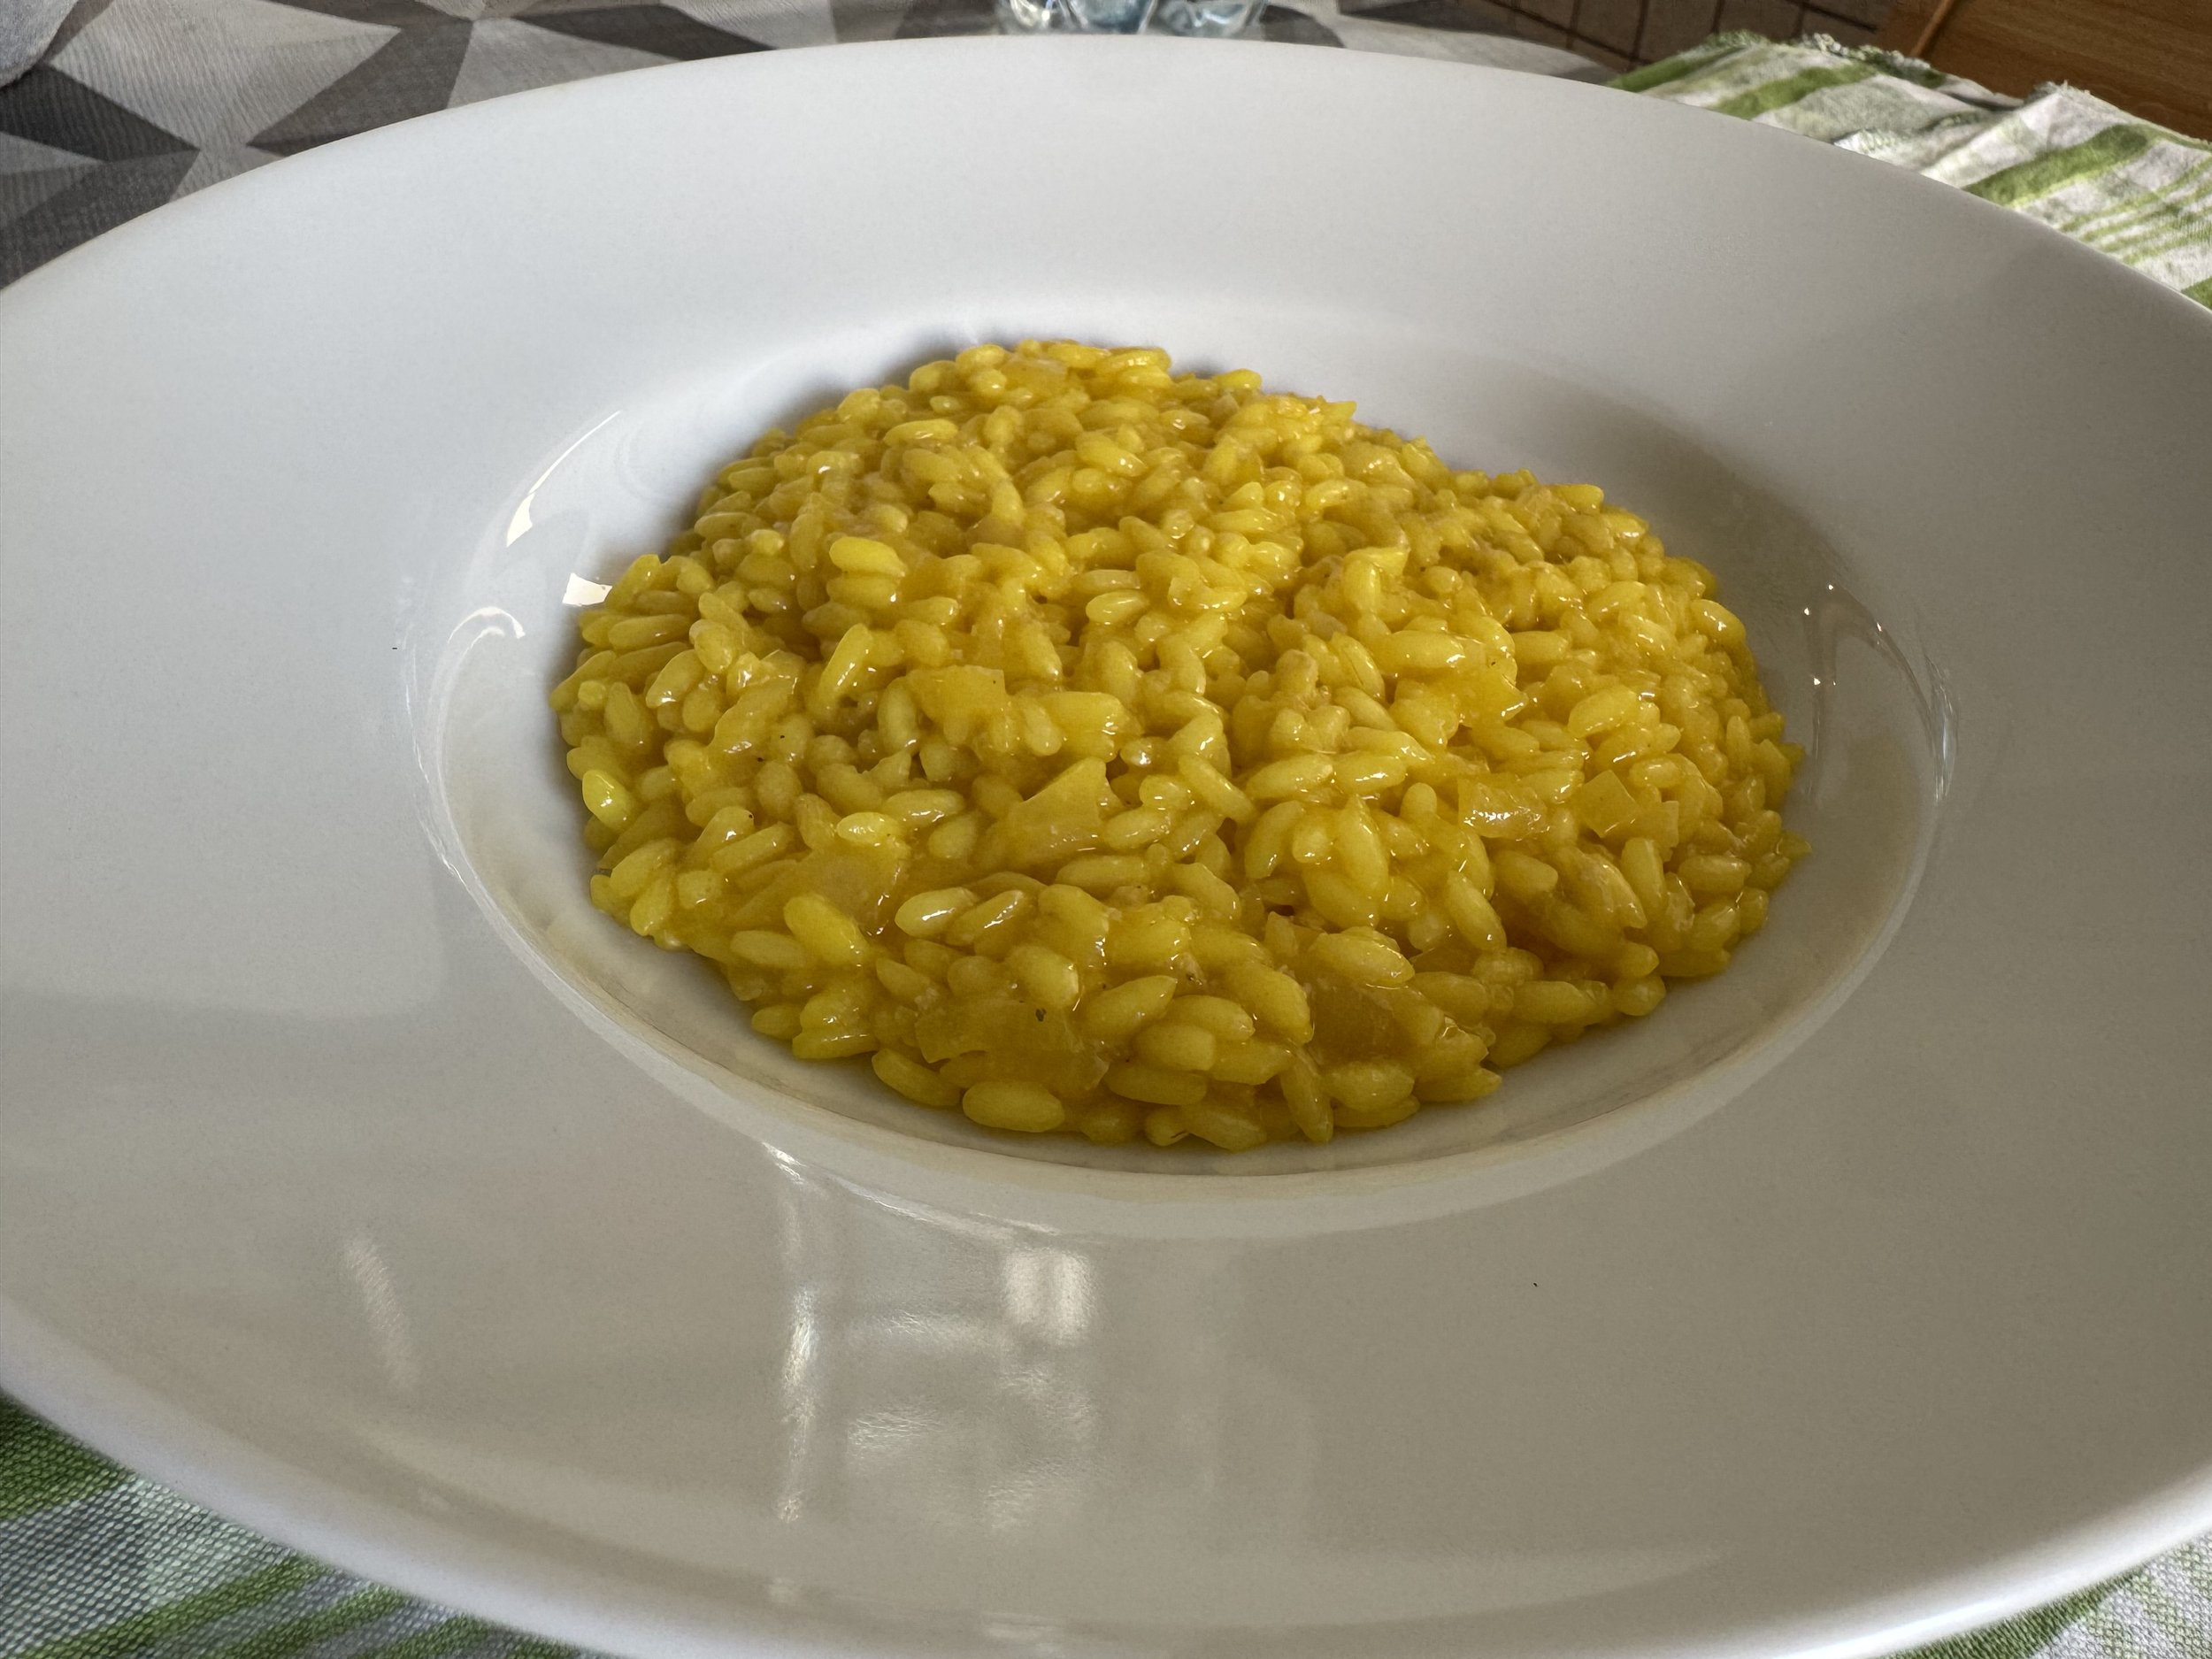
SAFFRON RISOTTO
Risotto is the ultimate comfort food.
Whether it’s sunny, raining, or you’re feeling down, saffron risotto is always a good idea!
It’s not hard to make, but it’s easy to mess up a few steps.
Below, I’ll walk you through the process step by step so you can make a well-balanced, flavorful, and creamy risotto every time!
FUN FACT:
Saffron risotto is commonly known as "Risotto alla Milanese" because it's one of the most traditional dishes from Milan.
INGREDIENTS FOR THE BROTH
1 onion
1 tomato
1 celery stalk
1 carrot
1 potato
1 zucchini
Salt to taste
INGREDIENTS FOR THE RISOTTO
1 yellow onion
1 ¼ cups (250 g) risotto rice (like Arborio or Carnaroli)
1 packet of saffron (or about ½ teaspoon of saffron threads)
⅔ cup (150 ml) white wine (for deglazing)
1 ½ tablespoons (20 g) butter (use vegan butter for vegan version)
1–2 tablespoons (20–30 g) grated Parmesan cheese (or nutritional yeast for vegan version)
Salt to taste
Extra virgin olive oil
Let’s start by preparing the broth:
Bring 4 cups (1.0 liter) of water to a boil.
In the meantime, wash all the vegetables.
Peel the potato and the onion.
Once the water is boiling, add 1 teaspoon of coarse salt and all the vegetables.
Let it simmer for 30 to 40 minutes.
Alternatively, you can use pre-made vegetable broth.
In this case, bring 4 cups (1.0 liters) of water to a boil. Once it starts boiling, reduce the heat to medium-low and add 1 tablespoon of broth powder (or 1 bouillon cube).

Stir and let it simmer for 10 minutes to develop flavor.
Then keep it on the lowest heat, just warm enough to stay hot throughout the cooking process.
Once the broth is ready, keep it on low heat so it stays hot.
Now, let’s start making the risotto!
Finely chop the onion and sauté it in 2 tablespoons of olive oil.
Once the onion becomes soft, lower the heat and begin toasting the rice.
To do this add the raw rice directly into the pan with the onion, and let it cook for about 2 minutes, stirring occasionally.
Let’s take a moment to understand what rice toasting is and why it’s important.
Toasting the rice is the secret to a great risotto.
It helps preserve the texture during cooking and prevents it from becoming mushy.
You’ll know the rice is toasted when the grains start to look shiny and translucent.
At this point, increase the heat to high and deglaze with white wine.
Let the wine fully evaporate, then reduce the heat again and start cooking the risotto.
Add 1 to 2 ladles of hot broth at a time, waiting for the rice to absorb it completely before adding more.
The broth should just barely cover the rice.
Stir constantly to prevent the rice from sticking.

About half way through, adjust with a pinch of salt. Then pour a bit of broth into a small glass, dissolve the packet of saffron, add it to the risotto and stir.
When the risotto is nearly ready—about 1 to 2 minutes away from being perfectly al dente—turn off the heat and add the butter and Parmesan.
Don’t stir it yet—let it rest for 2 minutes.
After 2 minutes, gently stir to melt the butter and cheese—this final step, called "mantecatura", gives the risotto its signature creamy texture.
Now all that’s left is to plate it up and enjoy.
Buon appetito! 🍽️
PIZZA


Today we’ll talk about how to make a great homemade pizza!
Every time I’ve been to the US, I’ve tried different pizzas, from the fresh pizzeria pies to frozen ones.
And to be honest, I have to admit that some of them were really good!
But I can assure you that authentic Italian pizza is very easy to make, inexpensive, and, most importantly, much lighter! That’s why Italians can eat an entire pizza and still have room for tiramisù. 😉
Below, I will show you step by step how to make a delicious homemade pizza, first off by preparing your dough in the morning so you can bake your pizza that same evening.
I’ll also reveal some great tips that will truly revolutionize the way you make pizza!
INGREDIENTS for about six people:
For the Dough:
2.2 lbs (1 kg) of all-purpose flour (less refined is better)
3.4 cups (800 ml) of room-temperature water
0.8 (22g)oz of salt
0.6 oz (17g)of active dry yeast (the kind in packets, be careful not to get the instant yeast, as it won’t make your pizza rise)
Toppings:
Of course, this is completely up to you. Here we’ll cover the classic combinations, but feel free to get creative... even with pineapple 😂
3 cups (700ml) of unseasoned tomato sauce (see parmigiana recipe)
14 oz (400g) of mozzarella (use vegan mozzarella for a vegan version)
Olives to taste
Basil to taste
Semolina flour for stretching the dough
INSTRUCTIONS:
Let's start by pouring all the flour into a large bowl. Then, add the salt and baking powder, and mix all the dry ingredients together.
At this point, start pouring in half of the water, mix, and continue adding the remaining water.
Mix all the ingredients well, first using a large spoon and then your hands.
The dough will look rough, but that's completely normal.

Cover it with plastic wrap and place it in the oven (turned OFF, but with the oven light ON).
This will slightly warm the environment where the dough will rest, helping the fermentation process.
Let the dough rest for 15 minutes, then take it out and fold it once. You'll immediately notice that the dough starts to gain strength and elasticity. After folding, cover it again and place it back in the oven.
Repeat the folding and resting process two more times.
These folds help create air pockets inside the dough, making it lighter.
Once the dough folding process is complete, let it rise for about 3 hours (still in the turned-off oven with the light on).
After three hours, you’ll see that the dough has doubled in size.
Now it’s time to portion the dough for the final rise.
Depending on the size of your baking pans, divide the dough as follows:
12–14 oz (350–400 g) for larger pans
7–9 oz (200–250 g) for smaller pans
Continue until all the dough is divided up.
Once the dough is divided, we stretch it on the countertop and then transfer it to the baking pan.
Once the dough is portioned, we’ll stretch it directly into the pans where it will later bake.To help with stretching, we’ll use semolina flour.
Sprinkle some on the work surface, place the dough on top, and lightly dust the dough with semolina as well.
This will prevent sticking while stretching.We’ll only use our hands, specifically our fingertips, to stretch the dough.
Start by pressing on one side, then turn the dough and repeat, always using your fingertips.You can decide how thick or thin you want your pizza.
Keep in mind that during baking, it will rise and become thicker. If you roll it out thin, the pizza will be crispier—like Roman-style pizza.
In the video, we also stretch the edges, so there won’t be a pizza crust, making it crispier (Roman-style pizza).
If you prefer, you can leave the edges unstretched, resulting in a higher crust (Neapolitan-style pizza).
In the initial photos, you can see the results of both types of pizza.
Once the dough is stretched, transfer it to the baking pan.
Line the pan with parchment paper, lightly grease it with oil, and carefully place the stretched dough inside, making sure it adheres to the edges as much as possible.
Repeat for each pizza.
Season the sauce by adding two / three tablespoons of extra virgin olive oil, a pinch of salt, and some basil.
It’s time for the toppings!
Start by preheating the oven to its highest temperature, using the static mode (no broiler, or the outside will burn).
Have you decided how to top your pizzas?
Let’s start like this: spread some tomato sauce on the pizza. Once the oven is fully preheated, start by baking the first pizza on the oven floor for about 10–15 minutes.

After that, take the pizza out, add a bit more sauce if it looks too dry, and finish with the rest of the toppings: mozzarella, olives, potatoes—whatever you like!
Then, put the pizza back in the oven, this time on the middle rack, for another 10 minutes.


Meanwhile, place the next pizza (with only sauce) on the oven floor and repeat the process.
Enjoy your meal!
P.S. Baking time may vary slightly depending on the thickness of your pizza. 🍕
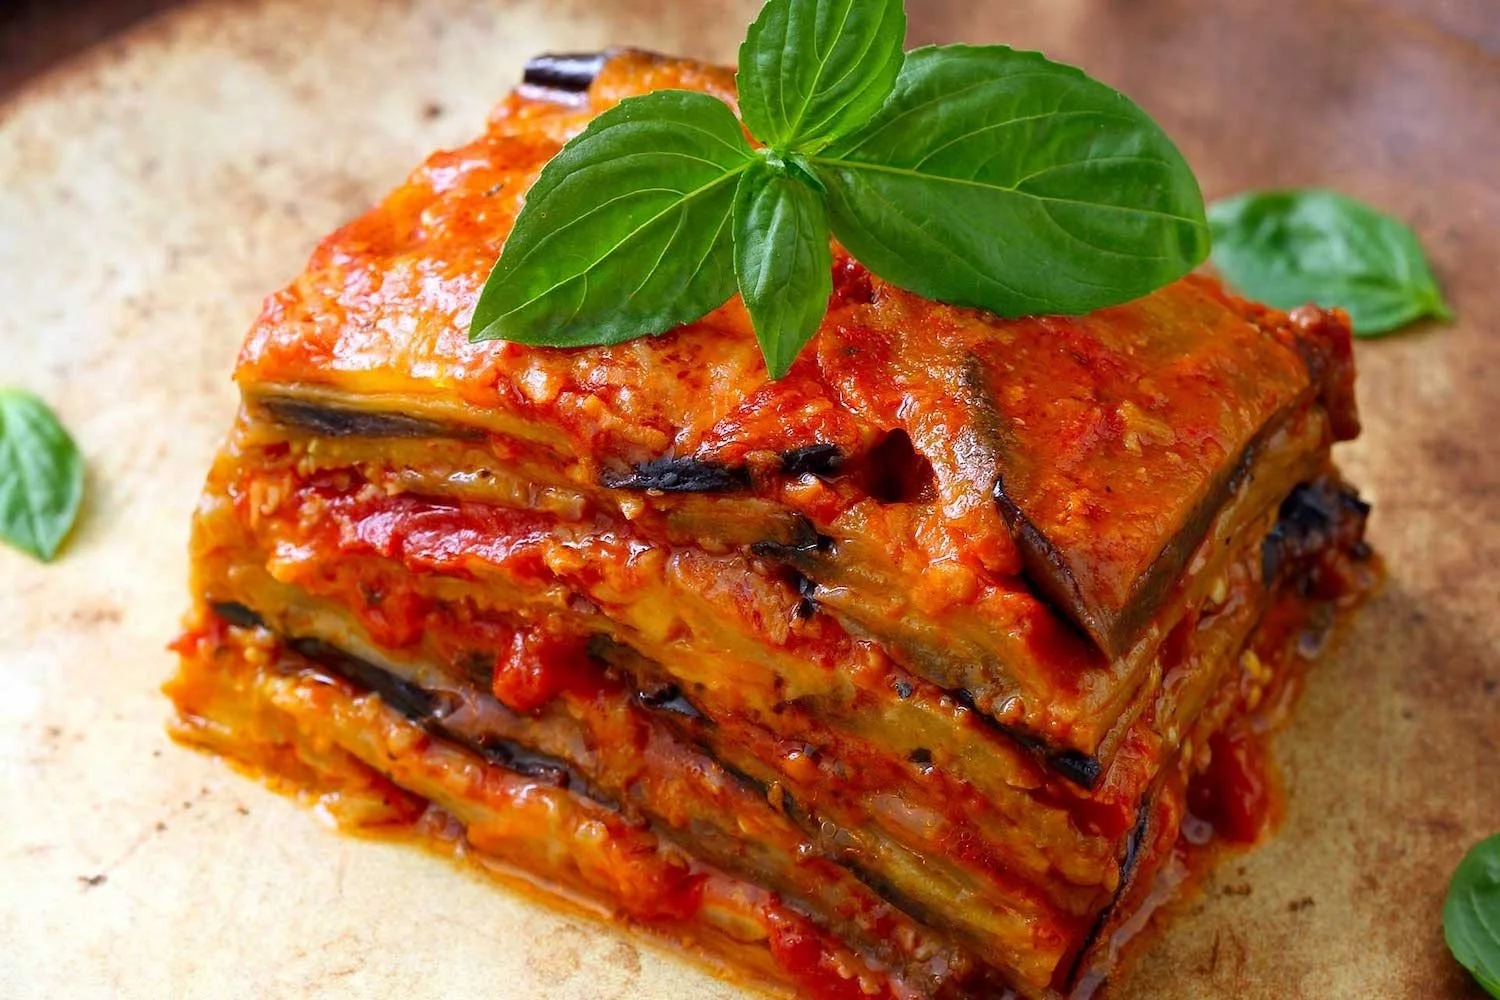
PARMIGIANA (EGGPLANT PARMESAN)
It all begins with an idea.
INGREDIENTS:
2 medium eggplants
5.5 cups tomato sauce (strained tomatoes)
10.5 oz mozzarella (use vegan mozzarella for a vegan version)
1/2 onion (about 1/2 cup if chopped)
3.5 oz Parmesan cheese (or nutritional yeast for vegan version)
Basil (to taste)
4 cups frying oil (vegetable oil or another oil of your choice)
Extra virgin olive oil (to taste, usually 3 tablespoons)
Salt (to taste)
Pepper (to taste)
2 cups flour (rice flour for a gluten-free version)
INSTRUCTIONS:
Slice the eggplants into about 1/4 inch thick slices. You can slice them lengthwise, as shown in the photo, or into rounds. Place them in a colander with a pinch of salt and let them rest for about an hour. This step will help draw out as much water as possible from the eggplants, so they won't absorb too much oil during frying, keeping the parmigiana light.

While the eggplant slices are resting with the salt, let's prepare the other ingredients, starting by slicing the mozzarella (and I know you want to use some random cheese, but no, mozzarella is something entirely different!). Set it aside so it can release any excess water. Then, let's move on to making a good sauce. Finely chop an onion and throw it in a pan with three tablespoons of extra virgin olive oil and a clove of garlic (just one 😂). Sauté for a minute, remove the garlic, and then add the strained tomatoes (make sure it’s not pre-made sauce—this completely changes the flavor of the recipe because, believe me, the ready-made sauces they sell in supermarkets are not real Italian sauces). Add half a glass of water to thin the sauce, add the basil, and let it cook for about 20 minutes on low heat. Once the cooking is done, adjust with salt and pepper and turn off the heat.

As soon as the hour is up, rinse the eggplants very well to remove the salt—make sure to do this, or they’ll end up too salty! Pat the slices dry with paper towels and prepare a plate with plenty of flour. Coat each slice on both sides with flour and heat 1 liter (about 4.2 cups) of vegetable oil in another pan. Once the oil is hot, proceed to fry each slice, and once they’re lightly browned place them on more paper towels to absorb the excess oil.

Preheat the oven to 350°F.
Assemble the parmigiana while the oven is heating.
In a baking dish, add a ladle of sauce, then a layer of eggplants, more sauce, slices of mozzarella, and plenty of grated Parmesan cheese. Continue layering like this until all the ingredients are used up.

Bake for about 30 minutes, then let it rest for 30 minutes before cutting into it. Enjoy! ( Buon appetito).
P.S. I don't think there will be any leftovers, but if there are it actually tastes even better the next day!
